
Complete Lash Mapping Guide
Contents
Introduction
What is Lash Mapping?
Popular lash map styles & templates
Understanding eye shapes
Choosing the correct lash
Mapping procedure
After-care
Conclusion
Introduction
Welcome to Lashmelovely’s guide on Lash Mapping. This article is for lash technicians who are eager to improve their skills in creating bespoke lash sets. Book a lash course now if you want to learn 1 to 1 at our salon. Our aim is to demystify the art of lash mapping, explore various lash mapping styles, and provide practical lash mapping guides. Whether you’re interested in classic lash mapping styles or looking for eyelash mapping guides, this resource is designed to cater to your needs.

What is Lash Mapping?
Lash mapping is a crucial and beneficial tool utilised during eyelash extension treatments. It allows lash technicians to offer their clients a variety of styles, customising each set to suit individual eye shapes and style preferences.
A lash map is a personalised template that guides the technician on where to place each lash across the lash line. This enables the creation of diverse looks, whether your client desires a natural or a more glamorous appearance. Lash mapping is particularly important when working with different eye shapes, as it helps enhance and balance the overall look.
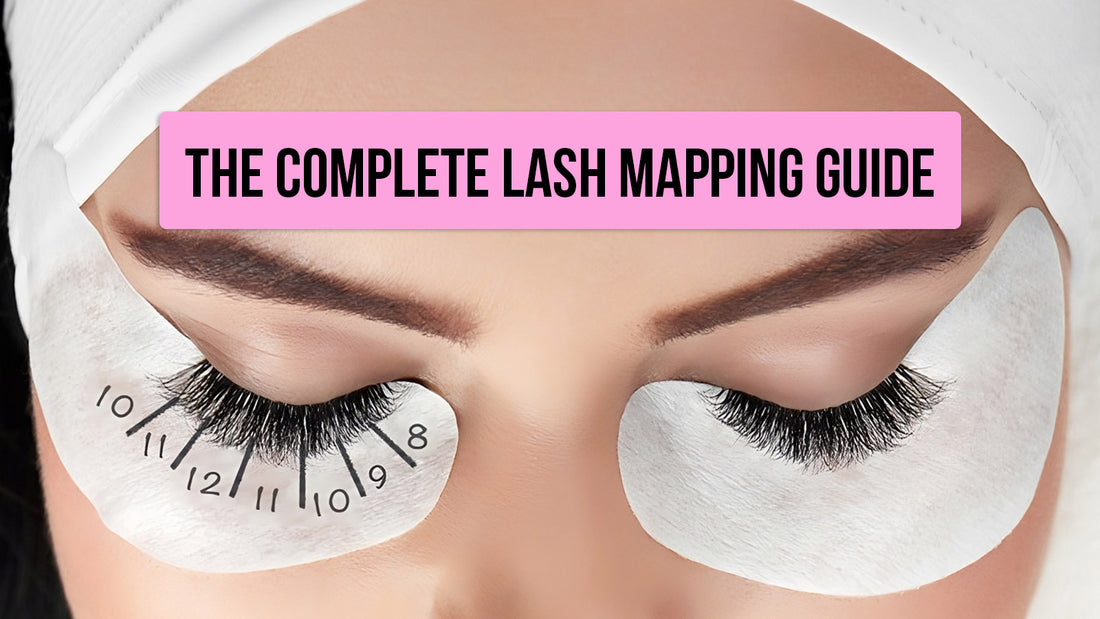
To map your sets, all you need is a pen and some gel lash pads! Simply draw different sections of lengths and curls on the pads, and you’re ready to lash! It’s important to draw your map after cleansing and priming to prevent smudging your markings. Some lash technicians prefer to use a coloured pen rather than black, as it can be seen more clearly among the lashes.
In essence, lash mapping is not just about applying lashes; it’s about creating a look that complements your client’s unique features and preferences. It’s the art of eyelash mapping, and with this guide, we aim to make you a master of it.

Lash Mapping Templates - Popular Styles
Some ‘ready-made’ lash map templates are available to buy online, we wouldn’t advise using these as there is no ‘one size fits all’ when it comes to eyes. You will achieve a much better look when you hand draw your map on the gel lash pads
Natural

This style is the most traditional for eyelash mapping. It follows the contours of your original length but just longer. This is the right style to choose for someone who wants a natural look, if they want something a bit more glamorous, this isn’t the one to choose!
Open Eye

This style accentuates the centre of the eye by adding length toward the centre of the lash line, tapering down at each end creating a symmetrical graduation. The perfect choice to open up narrow-shaped eyes.
Cat eye

This is a great choice for a more glam look. The lashes begin at the inner corner at their shortest length and gradually get longer toward the outer corner. The difference in length is around 50% more by the time we reach the outer corner, this gives the appearance of a flick at the ends.
Baby Doll

This style is a cross between the natural and an open eye style The Doll Eye is a full look which is created by length right across the eyeline with the longest lashes being focused on the middle of the eye.
Squirrel

This look is created by starting short and gradually get- ting longer with the halfway point being the longest length and then gradually getting shorter again.
Kim-K

This is one of the most popular lash styles. The Kim K look involves placing ‘spikes’ (longer lengths) in different sections of the eye to create a wispy set

Understanding Eye Shapes
Being a lash technician, you will know that every client has different shaped eyes and we need to create a look that best suits them. Here are some eye shapes that you may come across and what lash mapping you can do to best enhance and balance that shape:
Almond eyes

This eye shape is considered the most proportionate eye shape. Almond eyes can support nearly any lash map styling.
Hooded eyelids

Suggestion - Open eye, squirrel eye or doll eye
When working with hooded eyelids you will need a map to open the eye. The most flattering is to have longer lengths in the middle of the eye. Be mindful of which curl you use, so that it doesn’t curl back into the lid.
Rounded eyes

Suggestion - Cat eye, Kim K eye or Squirrel eye
When working with eyes that are a round shape, going for a less curl on the lash is better and placing the longer lengths towards the outer edge of the eye can create more of an almond shape. If the wrong map was used, it could give your clients a surprised expression!
Downturned eyes

Suggestion - Cat eye or squirrel eye
This is where the spacing between these eyes is less than one eye space apart. Attention needs to be drawn towards the outer corners of this style to help balance the look.
Deep set eyes

Suggestion - Cat eye or squirrel eye
This is where the spacing between these eyes is less than one eye space apart. Attention needs to be drawn towards the outer corners of this style to help balance the look.
Deep-set eyes

Suggestion - Open eye or Doll eye
These are eyes that are set back in the eye sockets, so these eyes require a styling that will bring the eye out. You will need to again be mindful of the lengths and curls that you use so that they don’t irritate the client's eyelids, this will be different from client to client.
Downturned eyes

Suggestion - Cat eye, squirrel eye or Doll eye
This eye shape is most common in Asian women. Generally the natural lashes are straighter so going for a lash curl that has flare will be more dramatic. Try to match the curl as closely as you can to enhance retention whilst still giving drama.
Protruding eyes

Suggestion – Shorter lengths and assess the general shape as well as the protrusion
You should try and maintain shorter length lashes when working on protruding eyes, avoid long lengths.
Choosing the Correct Lash
The length of the eyelash extensions that you choose will determine what kind of look you want to achieve. You will need to be mindful of the client's eye shape and the length of their natural lashes. Never apply lashes that are 50% longer than the client's natural lashes. Also take a look at the thickness of the client's natural lash, clients with very fine lashes would need to have extensions applied that are closer to the natural length. The thickness of the extension should also be altered for fine lashes, using a 0.15mm thickness is preferred over a 0.2mm thickness for example.
Follow the mapping guide to see where the lengths go, your maps will differ from client to client in lengths but they will be ascending and descending at the same points.
Remember, the length you choose, may not always be a longer length extension that the clients natural lash when you are creating a new lash line style. More volume can be added with shorter length lashes and longer length may not always look better on your client.
One more thing to bear in mind is if your client wears glasses, it will drive them crazy if they brush against the lens with every blink!
The curl of the lash will determine the look. Take into consideration the look you are trying to achieve and the shape and size of the eye, eyelid and brow.
Lash Cures

Lash Thickness

Lash Lengths

Lash Mapping Procedure
1
Carry out a consultation with your client to find out what type of look they want to achieve. Educating your clients on the names and looks of styles can be helpful to both your client and yourself. Look at the client's eye shape and size to help you choose your mapping style.
2
Cleanse your client's eye area and apply the gel lash pads, ensuring all bottom lashes are held down out of the way. Always apply pads a little way away from the waterline. Use a little bit of tape over the top of your pad if needed to better fit the eye and cover the bottom lashes.
3
If you need to apply a primer, do this before marking your map as it could smudge your markings.4
With a pen (coloured is preferable) mark your sections and write your lengths using your chosen map style. Sections and lengths may differ slightly in size due to your client's eye shape and size.5
Isolate and start applying your lashes, giving enough space and time for drying and to avoid clumping.6
Fill the lash line until your set is complete.
7
Ensure your glue is dry before asking the client to open their eyes, using a fan or similar.
8
Show your client their wonderful bespoke set.
9
Fill out a record card. Note down which lash map style you used and the length, thickness and curl, so you are ready for infills.
After-Care
- Don’t let lashes get wet for at least 24 hours
- Brush and cleanse lashes daily
- Avoid oily products on or around the eye area
- Do not pick or pull at your lashes
- Have regular infills every 2-3 weeks

Conclusion
Congratulations on completing Lashmelovely's guide on Lash Mapping. We’ve journeyed through the intricacies of lash mapping, explored various lash mapping styles, and provided practical lash mapping guides. We’ve delved into understanding different eye shapes and choosing the correct lash for each unique client.
Remember, the art of eyelash mapping is not just about applying lashes; it’s about enhancing your client’s natural beauty and confidence. It’s about creating a look that’s as unique as they are.
As you continue to practise and perfect your lash mapping skills, remember that every eye is a new canvas, and every lash map is a masterpiece waiting to be created. Whether you’re working with classic lash mapping styles or innovating your own, your journey in the world of lash mapping is just beginning.
Thank you for choosing this guide as your companion in this exciting journey. Here’s to creating stunning, bespoke lash sets for your clients, one lash map at a time!
LASH MAPPING FAQ
Can I mix different lash mapping styles on one client
Absolutely! Combining different lash mapping styles can create a unique and tailored look that enhances your client’s natural eye shape and achieves their desired appearance.
How can I ensure my lash maps are symmetrical?
To achieve symmetry, use gel lash pads and a pen to carefully mark sections and lengths. Always map both eyes simultaneously and check frequently during application to ensure balance.
Are there specific lash curls that work best for certain eye shapes?
Yes, the curl of the lash can greatly impact the final look. For example, a D curl works well for hooded eyes to prevent the lashes from touching the lids, while a C curl is more suited for rounded eyes to elongate the eye shape.
How do I choose the right lash length for my client?
Consider the client's natural lash length and eye shape. Never apply extensions more than 50% longer than their natural lashes to ensure comfort and optimal retention. Use your lash map as a guide to distribute lengths evenly.
Can lash mapping help with clients who wear glasses?
Definitely. When mapping for clients who wear glasses, ensure the extensions are shorter to prevent them from brushing against the lenses, which can be irritating.
What should I do if my client has very fine natural lashes?
For clients with fine lashes, opt for thinner extensions (e.g., 0.15mm rather than 0.20mm). This ensures that the natural lashes can support the extensions without becoming damaged.
Is it necessary to adjust my lash mapping technique for seasonal changes?
Yes, environmental factors like humidity and temperature can affect adhesive performance and lash retention. Adjust your mapping and application techniques accordingly, and use products suited for the current season.
How can I speed up my lash mapping process?
Practice is key. Regularly refining your mapping technique and familiarizing yourself with various styles will make the process quicker. Pre-draw maps for commonly requested styles to save time during appointments.
Do different lash materials affect the outcome of the mapping?
Yes, materials like mink, silk, and synthetic can impact the final look and feel. Mink lashes, for example, are lighter and more flexible, which can create a softer look compared to synthetic lashes.
Can beginners use lash mapping effectively?
Absolutely. Lash mapping is a valuable tool for beginners as it guides the placement of each lash, ensuring a cohesive and balanced look. With practice, beginners can master this technique and create professional-quality lash sets.